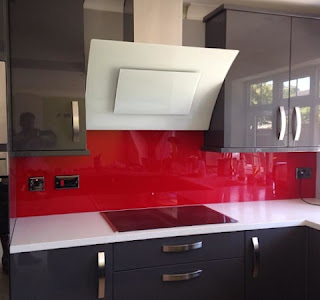
Know Why Acrylic Splashbacks Widely Trusted!
These provide a backdrop against the walls, which acts as a protective layer for the walls. While cooking, you can now not worry about greasing the walls as these sheets will serve as an outer covering for your walls. In addition, they are durable and easy to maintain. These inexpensive acrylic splashbacks are a must for your homes. These are often known as Perspex splashback or plastic splashback. Their use is not just limited to your kitchens; it can be used in your bathrooms as well. However, being a petroleum-based product, these tend to fade with prolonged use and exposure to sunlight or harsh chemicals, so it is advisable to use them only for the interiors of your house.
Why choose acrylic splashbacks?
Acrylic splashbacks are also made of glass, but the acrylic ones are cheaper as compared to the glass ones. Moreover, they give the same aesthetics to your house as the glass ones would. Besides being a more affordable option, it is also highly durable and can be cut as per your whims and fancies to fit your house. Acrylic is generally much thicker than glass and lighter in weight. This makes them less likely to get damaged. These can be purchased in a variety of colours.
Note- Within 200mm of gas/electric hob or an open heat source, acrylic splashbacks should not be fitted.
How to measure acrylic splashbacks?
● Once you have the area planned out, where you will use the sheets, draw it out on a piece of paper. Include the parts that will require cutouts, for example, sockets and isolators.
● While fitting acrylic splashbacks to spaces between your workplace and cupboards, ensure to leave a 1mm top and bottom to ensure minimal movement. You can fill in the small gaps left out with sealant later to prevent moisture from damaging your walls.
● Measuring the total height and width of acrylic needed comes next. Make sure to mark the 1mm top and bottom. Any cutouts that are required for sockets etc. should be kept too, leaving slight gap movement.
● After getting all the measurements, ask experts to cut the acrylics according to your exact specifications, or you can attempt to cut it yourself too.
How to install acrylic splashbacks?
You can install these with the help of both screws and double-sided tape (adhesive). After measuring and cutting the splashbacks according to the measurements, you can polish the edges using water and sandpaper. Make sure to not rush with this process. Now depending upon the transparency of your acrylics, you can fit it with either adhesive or screws.
Keep in mind to do a “dry fit” to ensure everything stays in place after installation. If you have used glue to install the splashbacks, leave it 24 hours before taking off the plastic cover. This is advised so that you do not end up removing the splashback instead. A sealant can be applied to fill in the gaps after this.
What are the critical features of acrylic splashbacks?
Acrylic splashbacks are available in a wide range of colours and are easy to clean. You can order the cut-to-size services, and they can easily be installed. You have the option of choosing between a range of different finishes, and you get a high gloss finish. Generally lightweight, these can be easily fabricated. Durability is a significant factor, and these splashbacks are weather resistant. Note- These are easy to clean. Wiping with a cloth, warm water, and detergent can suffice.
At Wholesale POS we specialize in manufacturing and supplying cut to size acrylic splashbacks and other Acrylic products.


Comments
Post a Comment